 Upworks Inc partners with ABOTTS to build their Oracle Cloud Infrastructure (OCI) and migrate their custom applications to OCI.
 Abotts Inc Partners with Gnorth consulting to deploy exadata and ODA for a large public sector customer.
Setting up a Jenkins Node on Metal server Using Terraform and configuring it for a CI/CD pipeline
Overview
This guide covers the essentials of provisioning a Jenkins server on Metal server using Terraform. We will deploy a single-node Jenkins installation and manually set up necessary plugins through the Jenkins UI.
Prerequisites
- An Metal account.
- Basic familiarity with Terraform.
- Access to your Metal API key.
Workflow
Step 1: Terraform Initialization
Terraform easily integrates with Metal. Using Terraform, you will be able to define the hardware specifications, Operating systems, and network settings for your servers. If you would like more information on using Terraform to deploy a server on Metal.
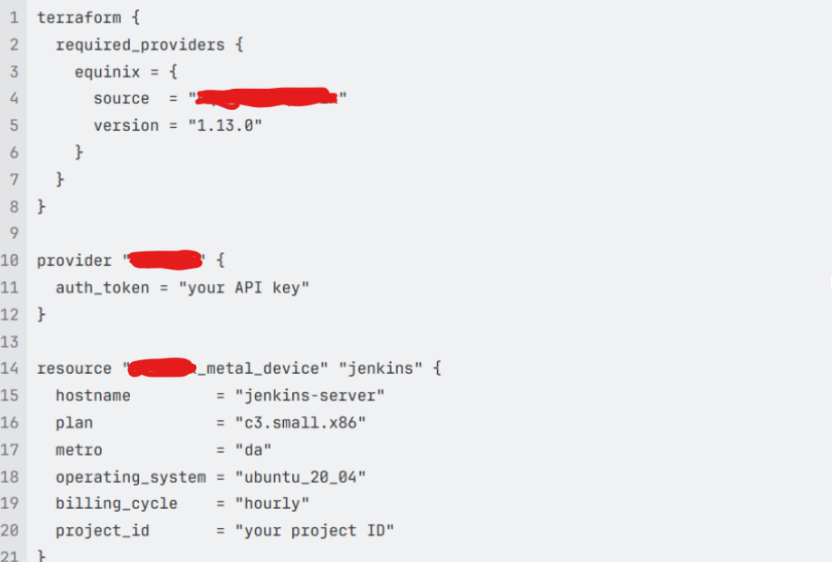
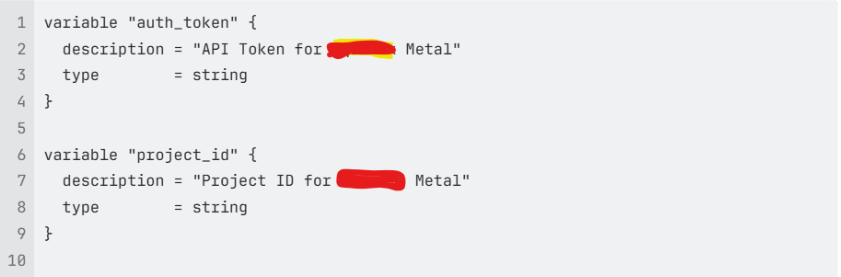
Then define any variables you might use in your configuration.
Lastly, in your terminal, navigate to the directory where your Terraform configuration is stored and run

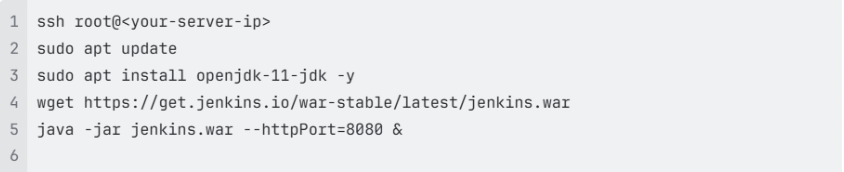
Step 2: Install Jenkins on the Provisioned Server
Once your server is up and running, SSH into it and install Jenkins
Step 3: Set up Jenkins and install essential plugins for the CI/CD pipeline
Setting up Jenkins for a CI/CD pipeline involves a few important steps after installation. Below is a guide for a basic setup to configure Jenkins for CI/CD purposes. This can be customized to fit your project’s needs.
- Access Jenkins by navigating to http://<your-server-ip>:8080 in your browser. You’ll then be prompted to unlock Jenkins using an initial admin password, which you can find in your Jenkins installation directory under secrets/initialAdminPassword.
- During the initial setup wizard, choose to install the suggested plugins. This will cover many commonly used plugins, including:
- Git plugin for SCM (Source Code Management)
- Pipeline plugin for orchestrating your CI/CD pipeline
- After installing the necessary plugins, you will be prompted to create an admin user. Fill out the form with your preferred information.
- Once logged in, configure Jenkins with the necessary settings:
- Go to Manage Jenkins > Configure System.
- Scroll to Jenkins Location, and ensure the Jenkins URL is correct. This should be http://<your-server-ip>:8080
- You can then Install any additional plugins needed for your pipeline:
- Go to Manage Jenkins > Manage Plugins > Available tab.
- Search for and install plugins such as:
- Docker Pipeline (if you use Docker).
- JUnit (for publishing test results).
- Or any specific tools or languages your projects might require.
- Set up your project’s source code repository in Jenkins:
- Go to Credentials > System > Global credentials (unrestricted) > Add Credentials.
- Choose the appropriate credential type (e.g., Username with password, SSH Username with private key) and enter your source repository credentials.
- Lastly, create your first Jenkins pipeline:
- Go back to the Jenkins main page and click New Item.
- Enter a name for your job, select Pipeline, and then click OK.
- In the job configuration page, scroll down to the Pipeline section.
- Choose either:
- Pipeline script: Directly write or paste your Groovy pipeline code in the script field.
- Pipeline script from SCM: Select this option to load your pipeline script from a source code repository. Specify the SCM like Git, add the repository URL, credentials, and the branch.
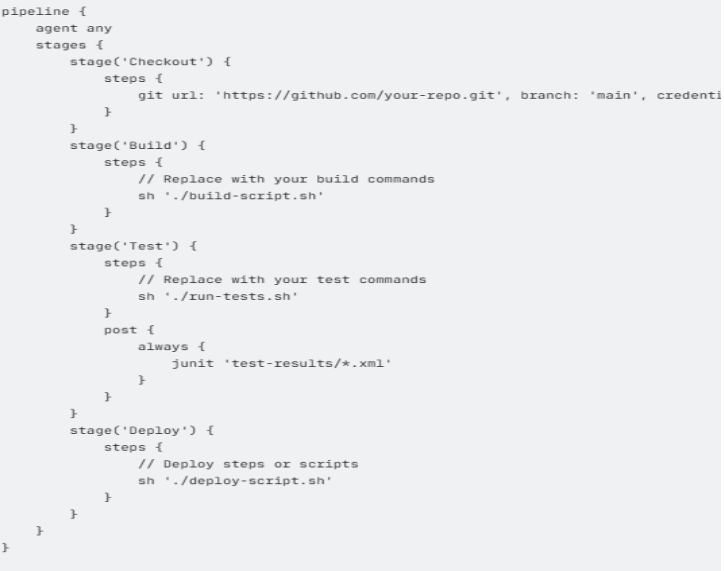
Here’s a basic example of a groovy script for a Jenkins pipeline that checks code, builds, and runs tests:
- Lastly, to run your Pipeline, save it and click Build Now to start the pipeline. Monitor the build progress from the Jenkins dashboard and check the output for any errors or successes.
- Using these steps, you’ve configured a basic CI/CD pipeline in Jenkins. This pipeline can be extended and customized to meet specific project requirements, such as adding deployment to staging or production environments, integration tests, or additional build steps.